
How to Use an HTTP Request Result from an API Inside a Power Apps Canvas App
When people start working with Power Apps and APIs, one of the first assumptions is usually this: “I will call an HTTP endpoint from the app, get the JSON, and use it directly in my controls.” In practice, the Power Platform model is a little different. Canvas apps are designed to work through connectors, custom connectors, and Power Automate flows, not as a generic raw HTTP client. Microsoft’s current guidance for canvas apps, connectors, and custom connectors reflects exactly that architecture. (Microsoft Learn)

That means the cleanest question is not “How do I run an HTTP request inside Power Apps?” but rather “What is the best way to bring the API result into Power Apps?” For most projects, there are two correct paths. The first is Power Apps → Power Automate → HTTP action → response back to the app. The second is Power Apps → Custom Connector → API. Both are valid, but they serve different levels of maturity in a solution. Microsoft Learn positions custom connectors as the reusable way to expose REST APIs to Power Apps when a built-in connector does not exist. (Microsoft Learn)
Why this matters in real projects
A canvas app is strongest when it focuses on the user interface: screens, inputs, galleries, forms, buttons, and simple formula logic. The integration layer should usually live outside the app. This is where flows and custom connectors help. They isolate authentication, API keys, HTTP details, JSON shaping, and error handling from the front end. Microsoft’s connector guidance for canvas apps emphasizes that app connections are the normal mechanism for talking to data sources and services. (Microsoft Learn)
This separation becomes even more important when you need to call an external service that returns JSON. The raw response might contain many properties that the app does not need. It might also require headers, tokens, pagination, or schema transformations. These are all easier to manage in Power Automate or inside a custom connector than directly in the app formula layer. Microsoft’s Power Automate data operations guidance specifically recommends using actions such as Parse JSON, Select, and Filter array to shape response payloads. (Microsoft Learn)
The simplest architecture to start with
The most practical beginner pattern is this:
Power App → Flow → HTTP call → Parse JSON → Respond to Power Apps
This pattern is often the best starting point because it is easier to debug, easier to secure, and easier to evolve. You can keep API-specific details out of the app and return only the fields that matter. That usually leads to simpler Power Fx formulas and a more maintainable app design. Microsoft documents the use of data operations in cloud flows and the use of Power Apps with connectors and custom connectors as the standard integration model. (Microsoft Learn)
Step 1 — Decide how the API result should come back to the app
Before you build anything, decide how much of the API response the app really needs. This is one of the most important design decisions.
You generally have two return models:
Model A — Return individual fields
This is the easiest option for labels, forms, and simple logic. Instead of sending the entire raw API payload back to Power Apps, your flow returns only the values that matter, such as city, temperature, and condition.
This is the cleanest approach when the response is small and predictable.
Model B — Return JSON text
This is useful when the response is complex, when you want flexibility, or when the shape may change. In this case, the flow returns a JSON string, and the app uses ParseJSON to read it.
Microsoft documents that ParseJSON converts a valid JSON string into a dynamic value, and that the result can then be accessed through dot notation and converted using functions such as Text(), Value(), and typed parsing scenarios. (Microsoft Learn)
Step 2 — Build the Power Automate flow
Create an Instant cloud flow and use the Power Apps (V2) trigger. Then add the HTTP action to call the external API. If the endpoint returns JSON, add Parse JSON to make downstream actions easier to work with. Microsoft’s data operations documentation explicitly points to Parse JSON as the action used to process JSON payloads in flows. (Microsoft Learn)
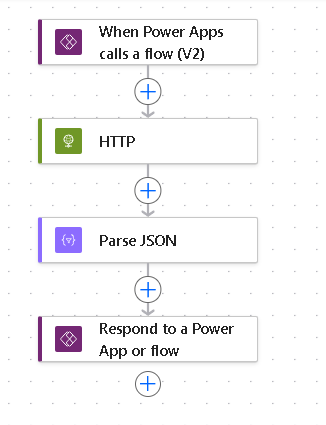
A typical flow sequence looks like this:
- Power Apps (V2) trigger
- Optional input parameters from the app
- HTTP action
- Parse JSON
- Optional data shaping with Select, Filter array, or Compose
- Respond to a PowerApp or flow
This is the most practical middle-layer pattern because the app receives a simplified response rather than the full complexity of the API.
Step 3 — Use the result inside Power Apps
Once the flow is connected to the app, you call it with .Run(...) and store the result in a variable.
If the flow returns simple fields, the formula is straightforward:
Set( varWeather, GetWeatherFlow.Run("Sao Paulo"))Then you use the fields directly:
varWeather.cityvarWeather.temperaturevarWeather.conditionThis is the cleanest experience because the app behaves as though it received a normal record.
Step 4 — Use ParseJSON when the flow returns raw JSON text
Sometimes the flow returns a field such as resultJson instead of returning many separate outputs. In that case, Power Fx can parse the string.
Set( varRawResult, GetWeatherFlow.Run("Sao Paulo").resultJson);Set( varParsed, ParseJSON(varRawResult));Then you read values from the parsed object:
Text(varParsed.city)Value(varParsed.temperature)Text(varParsed.condition)Microsoft Learn explains that ParseJSON returns a dynamic value and that fields are accessed through dot notation, with explicit conversion often needed to use the result safely in formulas and controls. (Microsoft Learn)
Step 5 — Handle arrays carefully
This is where many makers run into trouble. If the API returns an array, such as a list of teams, matches, or weather records, you can technically return that raw JSON to Power Apps and parse it there. But in real projects, it is often better to shape the array inside the flow first. Microsoft’s data operations documentation highlights Select, Filter array, and similar actions precisely for this kind of transformation work. (Microsoft Learn)
For example, if your API returns a large object with ten fields per item but the app only needs name, points, and position, the flow should reshape the payload before returning it. This reduces complexity in Power Fx and improves maintainability.
This is one of the most practical lessons in Power Platform architecture: the more you normalize the payload before it reaches the canvas app, the cleaner the app becomes.
Step 6 — Move to a custom connector when the API becomes strategic
Flows are excellent for quick solutions, prototypes, and single-purpose integrations. But if the same API will be reused across multiple apps or multiple flows, then a custom connector is usually the better architecture. Microsoft Learn describes custom connectors as the way to integrate APIs when a built-in connector is not available and to make that API reusable inside Power Apps and Power Automate. (Microsoft Learn)
A custom connector gives you a more native Power Apps experience. Instead of placing HTTP details in a flow, you expose API operations as actions that the app can call more cleanly. This is especially useful when:
- the API will be used in multiple solutions
- the authentication model is stable
- you want a more enterprise-friendly pattern
- the API becomes part of your platform design
In that model, the call looks conceptually like this:
Set( varWeather, MyWeatherConnector.GetWeather("Sao Paulo"))That is much cleaner than scattering multiple flow calls throughout an app when the integration becomes permanent.
Step 7 — Think in layers, not in a single formula
A common beginner mistake is trying to solve everything in the Power Apps formula bar. In production solutions, it is better to think in layers:
Layer 1 — Canvas app
Responsible for:
- screens
- inputs
- labels
- galleries
- forms
- user interaction
Layer 2 — Flow or custom connector
Responsible for:
- HTTP calls
- headers
- authentication
- secrets
- JSON parsing
- response shaping
- error handling
Layer 3 — External API
Responsible for:
- business data
- service logic
- external system behavior
This layered model matches how Microsoft documents the connector and custom connector ecosystem for Power Apps. (Microsoft Learn)
Step 8 — Error handling should be part of the design
Do not treat error handling as an afterthought. API calls can fail for many reasons: bad parameters, authorization issues, timeouts, unavailable endpoints, malformed responses, or throttling.
A strong pattern is to return a structured response from the flow, such as:
{ "success": true, "message": "OK", "city": "Sao Paulo", "temperature": 27}Then Power Apps can react clearly:
Set( varResult, GetWeatherFlow.Run("Sao Paulo"));If( varResult.success, Notify("Data loaded successfully", NotificationType.Success), Notify(varResult.message, NotificationType.Error))This is much easier to maintain than sending raw failures into the app and trying to decode them there.
Step 9 — The most practical recommendation
For most makers and most business apps, the best sequence is:
- Start with a Power Automate flow
- Use the HTTP action
- Parse the JSON response
- Shape the response into a small and app-friendly structure
- Return the result to Power Apps
- Use
Set()to store the output - Use labels, galleries, and forms based on the returned fields
- Move to a custom connector only when the integration becomes reusable or strategic
This approach reduces friction, improves security, and matches the way the platform is designed to work. Microsoft Learn’s current documentation across connectors, custom connectors, Power Fx JSON handling, and Power Automate data operations consistently supports this direction. (Microsoft Learn)
Final thoughts
The key lesson is simple: in Power Apps, the important thing is not just getting an HTTP response, but getting it into the app in a shape that Power Fx can use comfortably. That is why the middle layer matters so much.
If you are starting out, build the flow first. Let the flow worry about the external API. Let the app worry about the experience. Once that pattern becomes familiar, then custom connectors become much easier to understand and adopt.
That is the difference between “making it work” and “building it well.”
Summary Table
| Topic | Recommendation |
|---|---|
| Direct raw HTTP in canvas app | Not the normal pattern |
| Best beginner approach | Power Apps → Power Automate → HTTP |
| Best reusable enterprise approach | Power Apps → Custom Connector → API |
| When to use ParseJSON | When the app receives raw JSON text |
| When to return simple fields | When the response is small and predictable |
| Best place to reshape arrays | In Power Automate, before returning to the app |
| Best place for secrets and auth details | Flow or custom connector, not the app |
| Best app formula pattern | Set(varResult, FlowName.Run(...)) |
| Best long-term design | Separate UI, integration, and API layers |
Technical Reference Table
| Source | What it supports |
|---|---|
| Microsoft Learn – Use a custom connector from a Power Apps app | Shows how APIs are exposed to Power Apps through custom connectors (Microsoft Learn) |
| Microsoft Learn – Overview of connectors for canvas apps | Confirms connectors are the standard data connection model for canvas apps (Microsoft Learn) |
| Microsoft Learn – ParseJSON function | Explains how Power Fx parses JSON text and exposes fields dynamically or with typing (Microsoft Learn) |
| Microsoft Learn – Working with JSON in Power Fx | Shows practical JSON parsing and field access patterns in Power Fx (Microsoft Learn) |
| Microsoft Learn – Use data operations in Power Automate | Supports using Parse JSON, Select, Filter array, and other shaping actions in flows (Microsoft Learn) |
| Microsoft Learn – Create a custom connector from scratch | Supports the reusable connector-based architecture when the API becomes strategic (Microsoft Learn) |
