Building App 1: A Minimal Power Apps Canvas App That Calls Power Automate and Shows São Paulo Weather
In this first version, the goal was deliberately small: build a simple Canvas App that calls a Power Automate flow, reads weather data from Open-Meteo, and displays three values on screen:
- temperature
- wind speed
- reading time
To keep the app easy to understand, I also added one small quality-of-life improvement at the end: a Reset button that clears the result and lets the user run the request again.
This article is intentionally written as App 1, not as a final enterprise solution. The idea is to create a stable baseline that works, is easy to explain, and can be evolved later into richer versions with dropdowns, multiple capitals, better formatting, and stronger error handling.
Microsoft documents that a Canvas App can trigger a Power Automate flow directly from a control such as a button, which is exactly the pattern used here. (Microsoft Learn)
Why I built this version first
When learning Power Apps integration with APIs, it is tempting to start with a large solution: multiple cities, dynamic dropdowns, timezone logic, formatted cards, collections, and conditional visuals. That usually makes the first version harder than it needs to be.
For App 1, the intention was different:
- keep the app tiny
- make the integration understandable
- prove the end-to-end flow works
- create a reusable baseline for the next versions
That means App 1 is not about sophistication. It is about clarity.
The architecture used in App 1
The application uses a very small three-part architecture:
Canvas App
→ calls
Power Automate flow
→ calls
Open-Meteo API
The Canvas App is responsible only for the user interface. The flow is responsible for the HTTP request and for returning a clean payload to the app. Open-Meteo is the external service that provides the weather data. Microsoft’s guidance for Canvas Apps and flows supports this pattern of starting a flow from an app control. (Microsoft Learn)
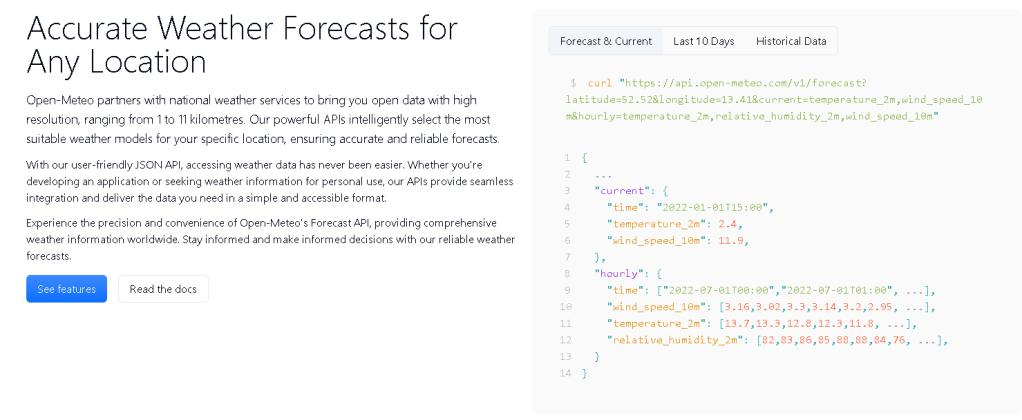
Why Open-Meteo was a good choice for this first app
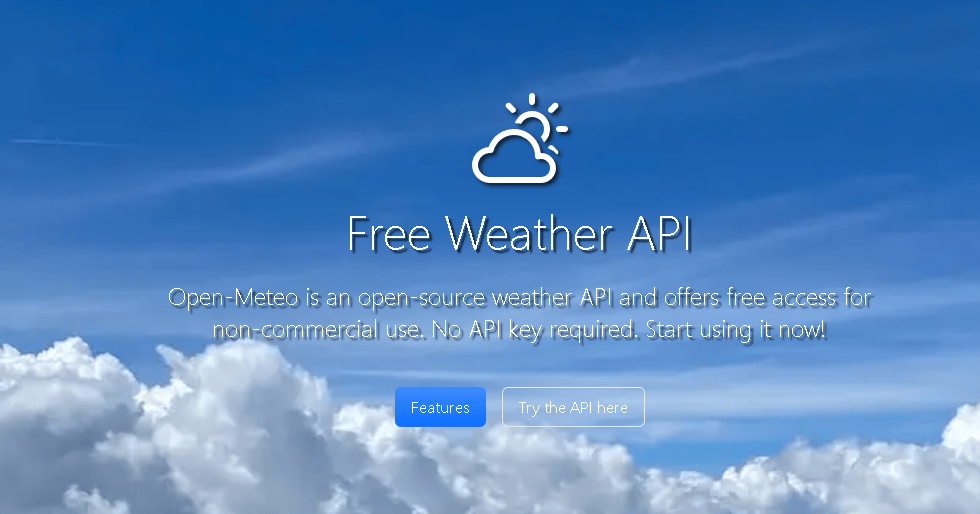
For a learning scenario, Open-Meteo is a very convenient API because it exposes a forecast endpoint with query parameters for latitude, longitude, and current weather values. Its documentation shows the /v1/forecast endpoint and the use of query parameters such as current=temperature_2m,wind_speed_10m. It also states that the service is free for non-commercial use and does not require an API key. (Open-Meteo)
That made it ideal for App 1 because I could focus on the Power Platform pattern rather than on authentication complexity.
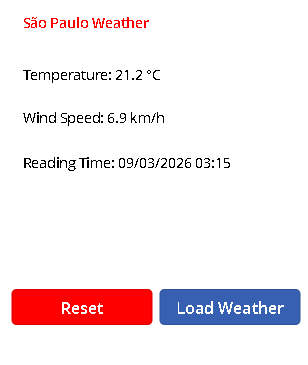
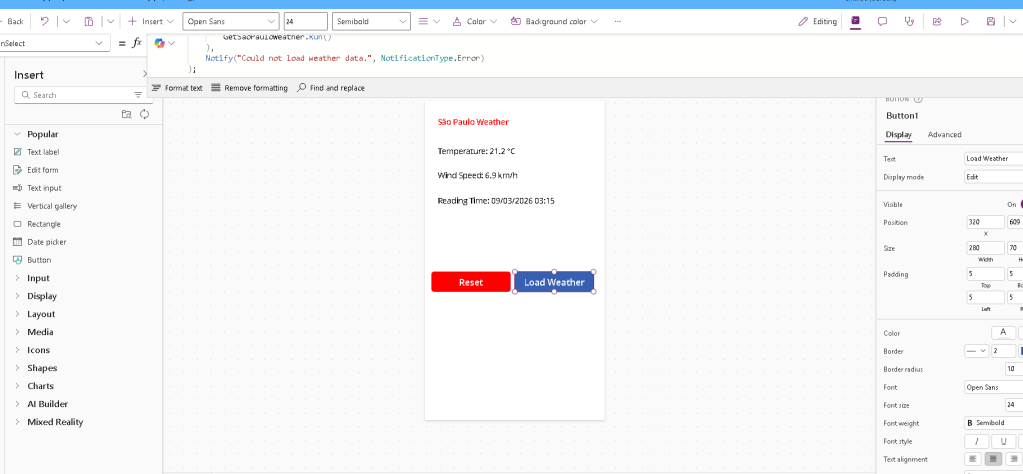
What App 1 displays
The screen shows:
- a title: São Paulo Weather
- a label for temperature
- a label for wind speed
- a label for reading time
- a Load Weather button
- a Reset button
This is intentionally minimal. The app was not designed to be visually rich yet. It was designed to be understandable and reliable.
Step 1 — Create the Power Automate flow
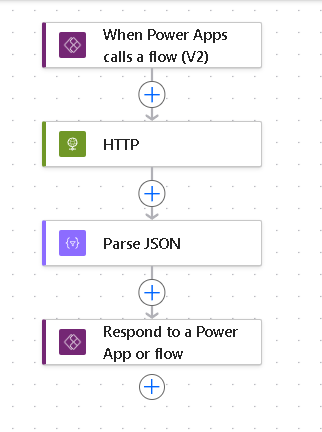

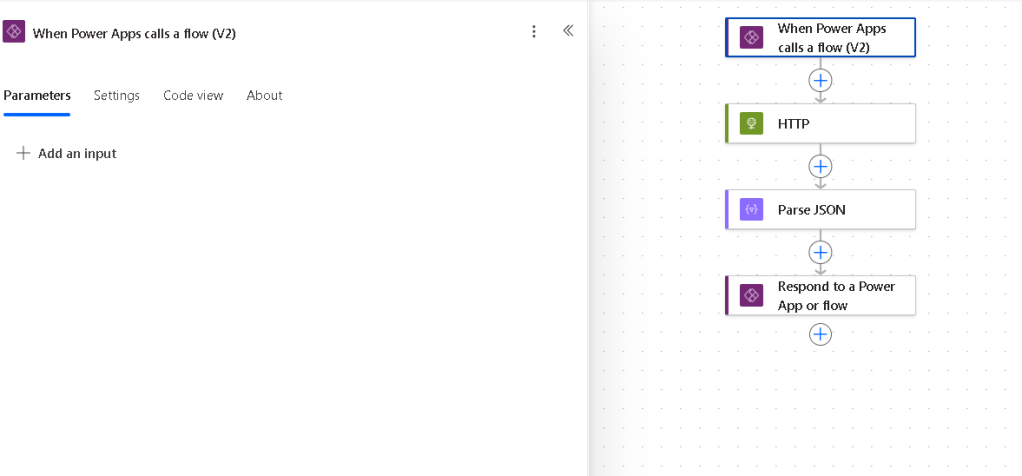
The flow begins with the Power Apps (V2) trigger. This is the trigger meant for flows that are launched from Canvas Apps. Microsoft documents this exact approach for starting a flow from a canvas app. (Microsoft Learn)
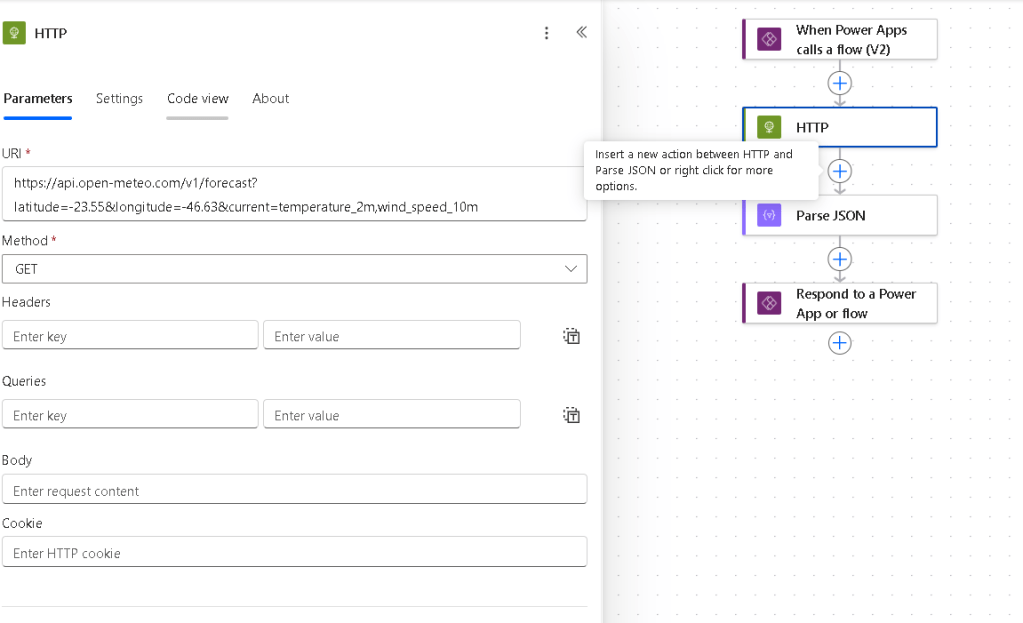
After that, the flow uses an HTTP action to call Open-Meteo. The request uses fixed coordinates for São Paulo in this first version. The endpoint follows the Open-Meteo forecast API structure. (Open-Meteo)
Example request URL
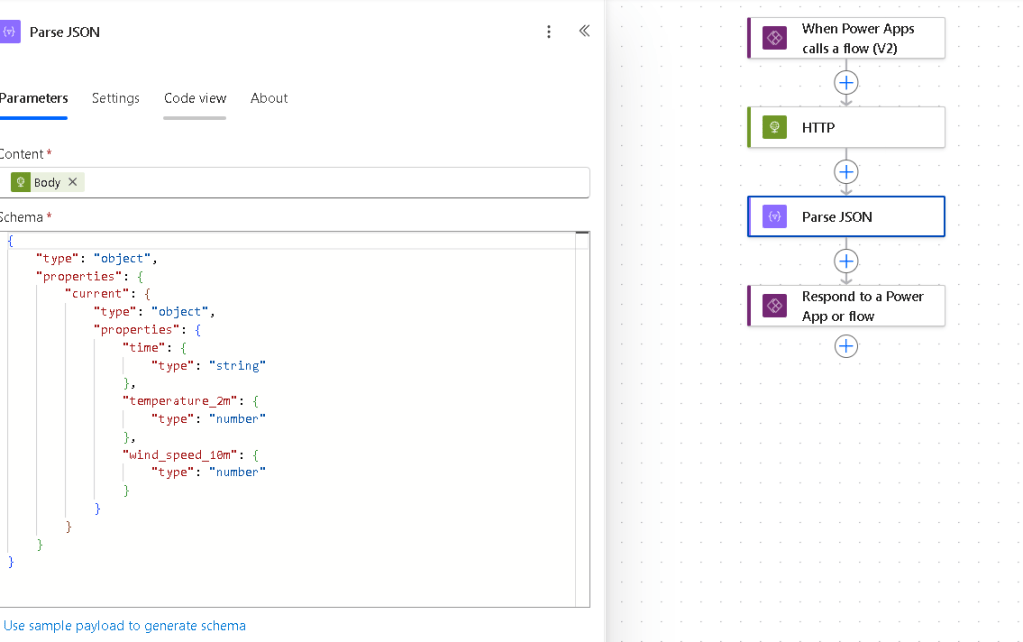
https://api.open-meteo.com/v1/forecast?latitude=-23.55&longitude=-46.63¤t=temperature_2m,wind_speed_10mThen the flow uses Parse JSON so the response fields can be accessed in a clean and explicit way.
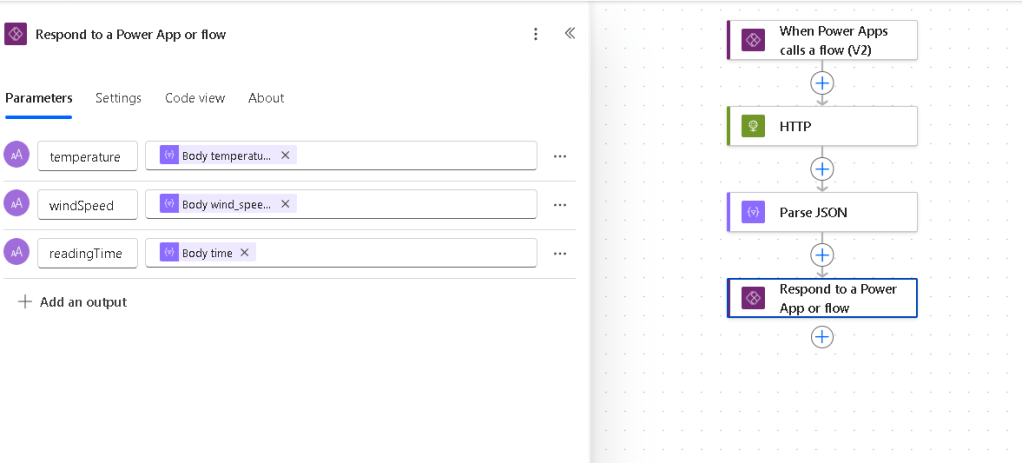
Finally, the flow ends with Respond to a PowerApp or flow, returning only the values the app needs:
temperaturewindSpeedreadingTime
This is one of the most important design choices in the app. Instead of sending the entire raw JSON response back to Power Apps, the flow sends back only a small, normalized payload.
Step 2 — Create the Canvas App
The app itself is a blank Canvas App with a few labels and buttons.
The logic is very small:
- the Load Weather button calls the flow
- the returned object is stored in
varWeather - the labels read values from
varWeather
That keeps the app simple and avoids pushing HTTP concerns into the user interface layer.
Step 3 — The main Power Fx formula for the Load Weather button
The button uses Set() to store the flow response in a variable.
Set( varWeather, GetSaoPauloWeather.Run())This is the most basic working version.
In practice, I also recommend wrapping it with IfError() when you want a slightly more robust version, but for App 1 the clean baseline matters more than overengineering.
Step 4 — Showing the values in labels
The labels are bound to the returned fields.
Temperature label
If( IsBlank(varWeather), "", "Temperature: " & Text(varWeather.temperature) & " °C")Wind speed label
If( IsBlank(varWeather), "", "Wind Speed: " & Text(varWeather.windSpeed) & " km/h")This keeps the screen clean after reset, because the labels become blank when varWeather is empty.
Step 5 — Converting the API time into a normal display format
The weather API returned the reading time as text in an ISO-style format such as:
2026-03-09T03:15For App 1, there was no need to solve timezone conversion yet. The only requirement was to display that value in a more normal, human-readable format.
Power Fx supports this through DateTimeValue() and Text(). Microsoft documents that DateTimeValue converts a date-time string to a date/time value, and that Text can format a date/time value with a custom pattern. (Microsoft Learn)
Reading time label
If( IsBlank(varWeather), "", "Reading Time: " & Text( DateTimeValue(varWeather.readingTime), "dd/mm/yyyy hh:mm" ))This does not change the timezone. It only converts the text into a normal display format, which was exactly the right scope for this first app.
Step 6 — Adding a Reset button
The next improvement was to add a Reset button so the app could be cleared without reloading the entire screen.
Power Fx provides the Reset() function for resetting controls to their default value, and Microsoft documents that behavior clearly. In App 1, however, the simplest requirement was just to clear the result variable. (Microsoft Learn)
Reset button formula
Set(varWeather, Blank())This is enough for App 1.
Because the labels were already written with If(IsBlank(varWeather), "", ...), clearing the variable automatically clears the displayed values.
If a loading flag exists, the formula can be extended like this:
Set(varWeather, Blank());Set(varLoading, false)That is still very small and very readable.
Why I did not add a city dropdown yet
At this point in the evolution, it was important to avoid changing too many things at once. Adding a dropdown with all Brazilian capitals is a valid next version, but it would introduce several new concerns at the same time:
- the dropdown data structure
- city-to-coordinate mapping
- parameterized flow inputs
- default selections
- possible timezone improvements
Those are all good ideas, but not for the first learning baseline.
App 1 had a different mission: prove that the pattern works end-to-end.
Lessons learned from this small version
Even this tiny app already teaches several important Power Platform concepts.
The first lesson is that a Canvas App does not need to know how to call an external API directly. It can delegate that responsibility to Power Automate and simply consume a clean output.
The second lesson is that flows should return only the fields the app needs. This keeps the formulas cleaner and makes debugging easier.
The third lesson is that many UI improvements in Power Apps are achieved not by complicated logic, but by very small patterns such as:
Set(varWeather, Blank())If(IsBlank(varWeather), "", ...)DateTimeValue(...)Text(...)
These are small formulas, but they create a noticeably better user experience.
Full Power Fx used in App 1
Load Weather button
Set( varWeather, GetSaoPauloWeather.Run())Temperature label
If( IsBlank(varWeather), "", "Temperature: " & Text(varWeather.temperature) & " °C")Wind speed label
If( IsBlank(varWeather), "", "Wind Speed: " & Text(varWeather.windSpeed) & " km/h")Reading time label
If( IsBlank(varWeather), "", "Reading Time: " & Text( DateTimeValue(varWeather.readingTime), "dd/mm/yyyy hh:mm" ))Reset button
Set(varWeather, Blank())Where this app can evolve next
With App 1 finished, there are several natural directions for App 2 and beyond.
The most obvious one is to replace fixed São Paulo coordinates with a dropdown of Brazilian capitals. That would make the app more reusable while still staying simple.
Another useful improvement would be adding a loading indicator and a basic IfError() pattern around the flow call.
A third step would be returning timezone or locality metadata from the flow, instead of handling only formatting in the app.
But all of that should come after the baseline is stable.
Final thoughts
This first app is simple on purpose, and that is exactly why it is useful.
It proves the full path works:
- Canvas App
- Power Automate
- external API
- returned values
- formatted display
- reset behavior
That gives you a clean starting point for future versions without mixing too many concerns too early.
For learning, that is often better than jumping directly into a more ambitious version.
Summary Table
| Section | What was implemented |
|---|---|
| Architecture | Canvas App calling a Power Automate flow that calls Open-Meteo |
| API strategy | Fixed São Paulo coordinates for a stable first version |
| Flow trigger | Power Apps (V2) |
| Flow output | temperature, windSpeed, readingTime |
| UI controls | Title, 3 labels, Load Weather button, Reset button |
| Main variable | varWeather |
| Date/time handling | DateTimeValue() + Text() for normal display formatting |
| Reset behavior | Set(varWeather, Blank()) |
| Design goal | Keep App 1 minimal, understandable, and stable |
Technical Reference Table
| Source | Why it matters |
|---|---|
| Microsoft Learn – Start a flow in a canvas app | Confirms that a Canvas App can trigger a Power Automate flow from a control such as a button. (Microsoft Learn) |
| Microsoft Learn – DateValue, TimeValue, and DateTimeValue | Confirms that DateTimeValue() converts date-time strings into Power Apps date/time values. (Microsoft Learn) |
| Microsoft Learn – Text function | Confirms that Text() formats date/time values with a custom pattern such as dd/mm/yyyy hh:mm. (Microsoft Learn) |
| Microsoft Learn – Show text, dates, and times in canvas apps | Supports the use of DateTimeValue and Text together for date formatting in Canvas Apps. (Microsoft Learn) |
| Microsoft Learn – Reset function | Confirms that Reset() resets controls and explains reset behavior in Power Fx. (Microsoft Learn) |
| Open-Meteo Forecast API documentation | Confirms the forecast endpoint structure and supported weather query parameters. (Open-Meteo) |
| Open-Meteo home page | Confirms free non-commercial use and no API key requirement. (Open-Meteo) |
