How to Copy SharePoint List Items to Another List in Power Automate — Including Attachments
Copying items from one SharePoint list to another looks simple at first glance, but in practice there is an important architectural detail: Power Automate does not provide a single native SharePoint action that clones a list item together with all of its attachments in one shot. The supported approach is to create the destination item first, then enumerate the source item’s attachments, retrieve each file’s binary content, and add those files one by one to the new item. That pattern aligns with the actions exposed by the SharePoint connector, including When an item is created, When an item is created or modified, Create item, Get attachments, Get attachment content, and Add attachment. (Microsoft Learn)
This article walks through a production-friendly design for that flow, explains the logic behind each step, highlights limitations such as system metadata preservation, and closes with a structured summary table you can reuse in your blog or internal documentation. The guidance below is grounded in Microsoft Learn and the official SharePoint connector documentation. (Microsoft Learn)
Why there is no single “Copy item with attachments” action
The SharePoint connector offers many list-oriented actions, but the workflow model is action-based rather than clone-based. In other words, the connector gives you the building blocks to recreate a destination item and then recreate its attachments, but not a monolithic “duplicate complete list item” command. This is why nearly every robust design uses a multi-step sequence rather than a one-click copy action. (Microsoft Learn)
This matters because many teams assume Create item will also bring over attachments automatically. It will not. The Create item action only creates the new list record and populates the fields you map into it. Attachments must be handled with a separate attachment loop afterward. (Microsoft Learn)
The recommended architecture
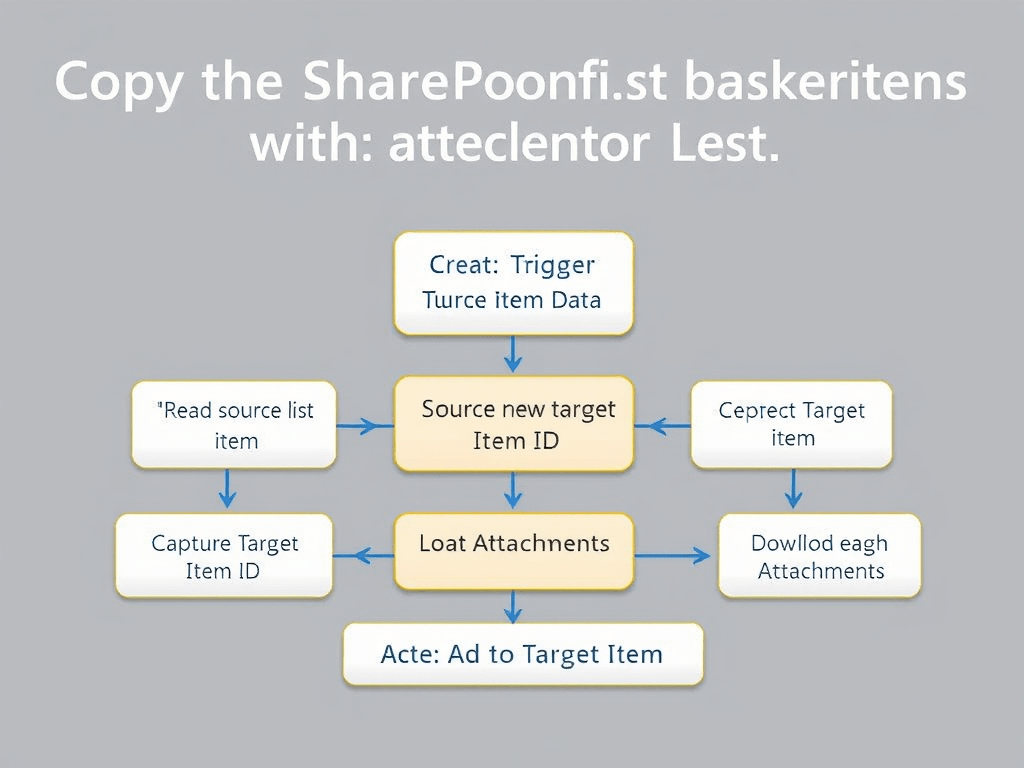
The best pattern is this:
- Trigger on the source list
- Read the source item data
- Create the target item
- Capture the new target item ID
- Get the source attachments
- Loop through attachments
- Download each attachment’s content
- Add each attachment to the target item
This is the cleanest native pattern for SharePoint-to-SharePoint list replication with attachments in Power Automate. It uses only supported SharePoint connector actions and avoids unnecessary custom code. (Microsoft Learn)
When to use this pattern
This design is ideal when you need to move or replicate business records between two lists such as:
- Draft list to approved list
- Intake list to operational list
- Request list to archive list
- Source list to reporting list
- Department list to centralized governance list
Because the SharePoint connector supports item triggers such as When an item is created and When an item is created or modified, this architecture works well for both event-driven flows and controlled process transitions. (Microsoft Learn)
Supported triggers you can use
The Microsoft SharePoint connector documents multiple triggers for list-based automation. For this scenario, the two most relevant are:
- When an item is created
- When an item is created or modified
The first is cleaner for one-time replication. The second is useful when an item may evolve before reaching the state in which it should be copied. Microsoft also documents that When an item is created or modified fires on every change, which is why trigger conditions or duplicate prevention logic are especially important in that model. (Microsoft Learn)
Step 1 — Create the trigger
Start with an automated cloud flow and choose one of these triggers:
- SharePoint — When an item is created
- SharePoint — When an item is created or modified
Set:
- Site Address = source site
- List Name = source list
If your business process only wants to copy finalized records, using When an item is created or modified plus a trigger condition is often better than copying immediately on creation. Microsoft Learn explains that trigger conditions can help you restrict executions so the flow only fires when a condition is satisfied, rather than running for every single update. (Microsoft Learn)
A practical example is to copy only when:
Submit = trueStatus = ApprovedReadyToMove = Yes
This keeps draft records from being duplicated too early. (Microsoft Learn)
Step 2 — Create the target item
After the trigger, add the action:
SharePoint — Create item
Configure:
- Site Address = target site
- List Name = target list
Then map the fields from the source item into the corresponding columns in the destination list. The target list must already have compatible columns, because the action populates existing fields rather than reproducing list schema automatically. The SharePoint connector supports list actions, but the list design itself remains your responsibility. (Microsoft Learn)
Typical mappings may include:
- Title -> Title
- RequestNumber -> RequestNumber
- RequestDate -> RequestDate
- Status -> Status
- Description -> Description
- Department -> Department
- Comments -> Comments
If your source and target lists are not aligned, fix the schema first. A stable list-to-list copy flow depends on matching destination columns. (Microsoft Learn)
Step 3 — Capture the new item ID
The output of Create item includes the ID of the newly created destination item. This value is critical because attachments can only be added to an existing list item. In practice, this means the flow cannot copy attachments first and then create the item later. The destination item must exist before you can add files to it. (Microsoft Learn)
This is one of the core reasons the flow sequence always looks like:
- create item
- then attach files
not the reverse. (Microsoft Learn)
Step 4 — Retrieve the attachment collection from the source item
Now add:
SharePoint — Get attachments
Configure:
- Site Address = source site
- List Name = source list
- Id = source item ID from the trigger
The SharePoint connector documents this action specifically for retrieving the attachment metadata for a list item. This gives you the set of files associated with the original source record. (Microsoft Learn)
At this point, the flow knows which files exist, but it does not yet have their binary content. That comes in the next step. (Microsoft Learn)
Step 5 — Loop through every attachment
Insert an Apply to each using the output from Get attachments.
Inside the loop, Power Automate will process one attachment at a time. This is the normal connector-based pattern for copying multiple attached files from one item to another. There is no batch “copy all attachments to another list item” action exposed by the SharePoint connector, so the loop is expected. (Microsoft Learn)
Step 6 — Download the content of each attachment
Inside the loop, add:
SharePoint — Get attachment content
Configure:
- Site Address = source site
- List Name = source list
- Id = source item ID
- File Identifier = file identifier returned by Get attachments
The connector documentation describes Get attachment content as the action that returns the attachment file content. This is the file payload you will pass into the destination item. (Microsoft Learn)
This step is essential because attachment metadata alone is not enough to reconstruct the file on the target item. You need the actual content stream. (Microsoft Learn)
Step 7 — Recreate the attachment in the target item
Still inside the loop, add:
SharePoint — Add attachment
Configure:
- Site Address = target site
- List Name = target list
- Id = ID returned by Create item
- File Name = attachment display name or name from the loop
- File Content = output of Get attachment content
This step recreates the file as an attachment on the destination list item. From a business perspective, the attachment has been copied. Technically, the flow has downloaded the source attachment and uploaded it again onto the new item, which is the supported connector-driven model. (Microsoft Learn)
Logical view of the flow
The final flow structure usually looks like this:
Trigger: When an item is created or modified ->Condition: only continue when business rule is true ->Create item (target list) ->Get attachments (source item) ->Apply to each attachment -> Get attachment content -> Add attachment (target item)
This is the simplest reliable structure for copying list items with attachments using only native SharePoint connector actions. (Microsoft Learn)
How to prevent duplicate copies
If you use When an item is created or modified, duplicate prevention becomes extremely important. Microsoft documents that this trigger fires on every modification, so without additional logic, the same source item might be copied multiple times. (Microsoft Learn)
The best practice is to add a helper column in the target list such as:
SourceItemIdOriginalItemIdSourceListItemId
When you create the destination item, write the source item’s ID into that field. Then, before creating a new target record, run Get items against the target list to see whether an entry already exists for that source ID. If it does, skip the copy. This pattern gives you traceability and protects against duplicates. The exact duplicate-prevention logic is your design choice, but the need for it follows directly from how the trigger behaves. (Microsoft Learn)
How to make the flow production-friendly
A basic flow works, but a production flow should be more deliberate.
A good enterprise version usually includes:
- trigger condition to avoid unnecessary executions
- duplicate detection against the target list
- clear field mapping
- attachment loop
- error handling with Scopes
- optional logging to another list
- optional Teams or email notification on failure
Microsoft Learn also emphasizes troubleshooting and trigger behavior, which becomes relevant when a flow seems to run too often, skip unexpectedly, or fail under specific list conditions. (Microsoft Learn)
A strong pattern is:
- Scope 1 — Validation
- Scope 2 — Create target item
- Scope 3 — Copy attachments
- Scope 4 — Log result
- Scope 5 — Error path
This makes support and maintenance much easier over time. (Microsoft Learn)
Important limitation: system metadata is not truly cloned
This is the part many projects overlook.
A connector-based flow can copy business fields and attachments very well, but it does not automatically preserve SharePoint system fields exactly as they existed in the original item. That includes fields such as:
- Created
- Modified
- Created By
- Modified By
Those values are normally controlled by SharePoint when the new item is created. So if the requirement is to reproduce the item exactly, including its original system metadata, the basic native SharePoint connector pattern is not enough by itself. The connector documentation describes the supported actions, but not a full-fidelity clone operation that preserves these internal system-controlled values automatically. (Microsoft Learn)
For many business processes this is acceptable. For migration-grade fidelity, it is usually not. (Microsoft Learn)
Person, lookup, and complex columns
Simple columns such as text, number, yes/no, date, and standard choice fields are usually straightforward to map. However, complex column types can require extra care.
For example:
- a Person field may require a resolved user object or claims-aware mapping
- a Lookup field may require the lookup ID rather than just the displayed text
- a Managed Metadata field may need special handling depending on the connector exposure and list design
Whether the mapping is simple or not depends on how Power Automate exposes the field in the action card and whether the source and target lists are structurally aligned. The SharePoint connector supports list operations, but it does not remove the need to understand how your list columns are represented. (Microsoft Learn)
In practice, test these columns early before assuming a one-to-one field mapping will behave perfectly. (Microsoft Learn)
Trigger conditions are worth using
If the flow should only run when an item reaches a specific lifecycle stage, trigger conditions are often a better design than allowing the flow to start on every edit and then filtering later. Microsoft Learn explains that trigger conditions help prevent unnecessary executions, which also helps reduce noise and wasted API calls. (Microsoft Learn)
Examples include:
- run only when
Submitis true - run only when
ApprovalStatusequalsApproved - run only when
TargetCopiedis false
This is especially important in approval workflows, governance lists, and request-driven operational processes. (Microsoft Learn)
Lists supported by the connector
One detail that is easy to miss in the connector documentation is that Power Automate flows for lists are supported for generic lists and generic document libraries, while custom list and library templates are not supported in the same way. That matters if someone expects the pattern to behave identically on legacy-style or specialized list templates. (Microsoft Learn)
For a standard modern custom list scenario, this flow pattern is fully reasonable. (Microsoft Learn)
When to stay native and when to go beyond native
The native Power Automate pattern is the right choice when you need:
- business field replication
- attachment replication
- moderate volume
- low-code maintainability
- fast delivery inside Microsoft 365
However, if the requirement becomes more demanding, such as:
- preserving Created / Modified / Author / Editor exactly
- handling extremely large-scale migrations
- reproducing item history with higher fidelity
- controlling behavior more precisely than the connector allows
then the solution usually moves toward a more advanced design, such as SharePoint REST through Send an HTTP request to SharePoint, or external migration tooling. The official SharePoint connector is powerful, but it is still a connector abstraction, not a full migration engine. (Microsoft Learn)
Practical build sequence you can follow in the designer
Here is the exact practical sequence I would recommend for a first production version:
- Create an automated cloud flow
- Choose When an item is created or When an item is created or modified
- Add a trigger condition if the business rule requires it
- Optionally check the target list for an existing
SourceItemId - Use Create item to create the destination record
- Save the new destination ID
- Use Get attachments against the source item
- Add Apply to each
- Inside the loop, use Get attachment content
- Then use Add attachment against the new target item
- Optionally write success or failure status back somewhere
That sequence stays close to Microsoft’s documented SharePoint connector capabilities and is easy to explain, support, and extend. (Microsoft Learn)
Final recommendation
If your requirement is “copy items from one list to another, including attachments,” this is the pattern I would implement first. It is native, understandable, maintainable, and grounded in the official SharePoint connector model. It is also the cleanest solution when you want to stay inside Power Automate without moving into Power Apps, custom code, or advanced migration tooling. (Microsoft Learn)
The most important expectation to set with stakeholders is this: the flow will copy the business record and recreate all of its attachments, but it will not behave like a forensic clone of every internal SharePoint system property. Once that distinction is clear, the architecture becomes straightforward and reliable. (Microsoft Learn)
Summary table
| Area | Recommendation | Why it matters |
|---|---|---|
| Trigger | Use When an item is created or When an item is created or modified | These are the core SharePoint list triggers documented by Microsoft. (Microsoft Learn) |
| Trigger filtering | Use trigger conditions when copying should happen only at a business milestone | This reduces unnecessary runs and API calls. (Microsoft Learn) |
| Item creation | Use Create item in the target list | This creates the destination record and returns the new ID. (Microsoft Learn) |
| Attachments list | Use Get attachments on the source item | This retrieves the attachment set for the item. (Microsoft Learn) |
| Attachment content | Use Get attachment content inside a loop | This retrieves the binary content needed for the target upload. (Microsoft Learn) |
| Attachment upload | Use Add attachment to the newly created item | This recreates each file on the target item. (Microsoft Learn) |
| Duplicate protection | Add a helper field such as SourceItemId in the target list | Essential when using modified-based triggers. (Microsoft Learn) |
| System metadata | Do not expect Created, Modified, Author, and Editor to be preserved exactly with the basic connector pattern | SharePoint controls these values on create/update. (Microsoft Learn) |
| Complex fields | Test Person, Lookup, and Managed Metadata columns early | These may need additional handling. (Microsoft Learn) |
| Best fit | Use this pattern for operational replication, approval movement, and archive copies | It is low-code, maintainable, and officially aligned. (Microsoft Learn) |
Reference links
Microsoft SharePoint connector for Power Automate
https://learn.microsoft.com/en-us/sharepoint/dev/business-apps/power-automate/sharepoint-connector-actions-triggers
SharePoint connector reference
https://learn.microsoft.com/en-us/connectors/sharepoint/
Customize your triggers with conditions in Power Automate
https://learn.microsoft.com/en-us/power-automate/customize-triggers
Use SharePoint and Power Automate to build workflows
https://learn.microsoft.com/en-us/power-automate/sharepoint-overview
Integrate SharePoint and Power Automate learning path
https://learn.microsoft.com/en-us/training/paths/integrate-power-automate/
Troubleshoot common issues with Power Automate triggers
https://learn.microsoft.com/en-us/troubleshoot/power-platform/power-automate/flow-run-issues/triggers-troubleshoot
Streamline SharePoint processes with Power Automate
https://learn.microsoft.com/en-in/training/modules/streamline-processes/
